At 5 posts into this corruptive little blog, I think it's time to visit a few concepts that as both a guitarist and audiophile, I often have to remind myself of, and in which a few of you may find some benefit.
As you might already know, this audio biz can get extremely maddening. Your mixes don't sound right, the guitars don't cut the way you would like, the drums are weak, etc. This usually ends with you standing in front of your recording rig with a baseball bat debating whether or not it's really worth it to have all of that gear. Just kidding . . . but it can certainly have that effect on your psyche. I know I have certainly felt that on numerous occasions. My purpose for this blog is to hopefully aid anyone in need of assistance in working on their own projects and in turn create a more competitive mix. It is very easy to get bogged down in all of the various technical sides of mixing, production, recording, etc. But, there is one thing to remember, especially for the guitarists (and really any musician who is dabbling in recording) . . . garbage in, garbage out or GIGO.
GIGO was a phrase/acronym I learned from a good friend (audio engineer) who took me under his wing when I started trying to record and mix my own tunes. This acronym encompasses the entire foundation of a good mix. In the spirit of GIGO and a good mix, you need several elements present (not necessarily limited to just these though):
1. Be able to play your instrument
This may sound harsh but it is true. Good audio production is not and should not be used as a cure-all for a lack of talent. This goes against the grain of today's musical ethics (or lack thereof) but I firmly believe it to be true. If you are going in to the studio (be it your own or someone else's) and you are going to record a song in the style of Yngwie Malmsteen, you had better be able to play it. In contrast, if you are a singer/songwriter and you play along on guitar (a la Melissa Etheridge), you should be able to execute that in a cohesive fashion.
2. Have a good song
Good song craft should be at the absolute core of any mix. To clarify, I'm using song craft to encompass the next top 40 pop hit, a progressive endeavor, a neoclassical symphony, or any other possible permeation of music in existence.
3. Known your gear and be competent at producing a good sound from your amp . . . prior to the recording rig.
It's very crucial that you know how your gear works and how to produce a pleasing tone that is not only useful in playing live, but also in a studio environment (trust me, they are different). We have all been guilty of this at some point or another, but it is really important to know how to tweak your gear based on the aural requirements of a situation. This could mean dialing in some more highs on your processor because the provided amp at the studio just isn't cutting it, or it could mean designing a new patch on the fly because the old one sounds really weak when recorded.
All this being said, it all comes back to item #1. There was a recent project I produced where an individual sent me their guitar tracks (his playing is absolutely incredible), and honestly I didn't have to do very much to them. Some slight carving in the EQ department, and a few tweaks to fit it in the mix and his tracks were good to go. This is the best scenario . . . both item #1 and #2 fulfilled. He plays extremely well and knows his guitar sound and how to capture it. If you are having to conduct edit after edit after edit, then it might be time to circle back to #1 with either yourself or the player(s) you are working with and rethink a few things. Now, this is not to say that you will always have a choice on who plays and who doesn't. Especially if you are only a link in the chain and a producer says that a certain individual is going to play on a particular recording, then that is a different scenario. Sometimes, you are required to work with what you have been given. However, that being said, much of this blog is centered around your own studio and your own projects.
Keep all of this in mind as you work through your endeavors and remember who you are in both playing and recording. These concepts will help you tremendously in the long run. Perspective is everything!
Wednesday, February 20, 2013
Thursday, February 14, 2013
Mix Depth: An Orchestra Conductor's Perspective
While we are cruising around the idea of spaciousness, let's discuss the idea of mix depth. To describe the semi-abstract world of mix engineering, I'm going to use a very real world example. For the guitarists reading this, set aside the guitar for a minute. No worries though; you can bring this back to guitar music and apply these concepts to many different areas.
Imagine a symphony orchestra from the conductor's point of view. This type of group can be around 100 players and requires (as I'm sure you can imagine) a sizable room in which to rehearse, and even more so to perform in. Each section extends row by row, further away from the conductor and eventually ends with the percussion section towards the back of the room (or in a performance setting, back of the stage). Due to the fact that every player in the room or on the stage, is sitting in a different spot with varying distances in relation to the conductor, the actual time it takes for the sound to travel between the two is going to vary greatly. The further away a player is from the conductor, the greater the delay in sound travel. So far, we have only discussed the physical delay between the players and the conductor. Now, there is reverb to take into consideration and depending on the size of the room and where you are standing, it will very widely. These factors create the very distinct depth that is associated with a symphony orchestra. We could spend a lot of time talking about that, however, I would like to just touch on it for the time being and head back to applying these concepts to a mix.
Stick yourself back in your mix chair, and imagine the conductor's position and his viewpoint. Now, considering we are in an artificial environment, there are lots of sneaky things one can do to establish depth in a mix. We are going to look at two of them. Remember the delay from the player to the conductor? You can add a small amount of delay to a track (or several) in order to distinguish them in the mix. Now when I say 'add delay,' I am talking about 20-30 ms. This is very specific to application though. It will all depend on what you are doing and how far back you want the track to sound (you don't want it to be out of time unless that is the vibe you're going for). Sound travels at roughly 1 ft. per ms so we are talking about mimicking sound traveling around 30 ft. If you have strings in your song, then this technique is crucial for a sense of both depth and realism (remember the orchestral imagery). This leads me to my second topic, reverb.
Reverb can be severely overused if you aren't careful so try to use it sparingly in the beginning. The use of this effect will place your mix (or elements thereof) in an environment. Be it a bathroom, a church, or a horse stall, it will be an environment that will have it's own characteristics which will in turn effect your mix a certain way. This is another topic that could become very drawn out so I will cut to the chase for this post. Depending on what I'm doing, I usually set up a reverb bus (normal bus with a reverb loaded into an effects send) and route whatever tracks I desire to it. As long as you use a 'send' on each track, you can control the send level to the reverb. To start establishing depth, only put a little (or no reverb) on the tracks that you want in the front of the mix. The tracks that you want further back, add a bit more reverb. The more tracks you have, the more you can (and should) layer to establish depth. So to wrap it up . . . based upon how deep you want your tracks to sound, and where you want to place your tracks in the mix, you can utilize delay and reverb to establish a sense of depth. Please feel free to comment or ask questions! This post was probably a little too short to explain certain aspects of depth so if there is something you want explained in a more detailed fashion, please feel free to ask away!
Tuesday, February 12, 2013
EQ your Mix: Creating Space
Aloha! After re-reading yesterday's post, I began thinking more about the other ways of creating space in a mix and I figured that right now might be as good a time as any for some more spacial discussion. So without further ado . . .


EQ, short for equalizer, is probably one of the most common forms of adjustment for music outside of the volume knob. Let's go old school for a moment . . does anyone remember the old boom boxes? If I remember correctly, mine had a 5-band EQ on it. At the time, I really had no idea what it was beyond making my cassette tapes sound different when adjusted. Even more basic is the typical car stereo EQ featuring treble, midrange (or mid), and bass. Often, we might change these settings based on the style of music we like and adjust accordingly to taste. What is really going on here though? Essentially we are adjusting the gain for a predetermined range of frequencies. As the names suggest, the controls on a car stereo (or basic home stereo) adjust the upper, middle, and lower areas of the frequency spectrum. Growing up, most of us have tweaked the sound of our favorite tunes in this fashion. EQ usage in mixing is WAY more in depth though . . .
Hang with me here, this will connect to mixing. Guitarists are notorious (I count myself in this discussion) for adjusting their amps (treble, mid, bass) and sounds in the same fashion as mentioned above. For starters, this IS NOT WRONG. However, this perspective can get an aspiring artist into trouble on occasion when mixing his/her guitar tracks in with other instruments. Again, I will repeat . . . there is NOTHING wrong with adjusting your amp in this fashion when you are just hanging out and jamming. Recording, mixing, and playing with a band is a whole different story though. We guitarists love big, thick tone. At times, this tempts us to crank up the bass (for example) on our amps. In a recording situation, you can start running into issues with the bass track if you overdo it. Despite the temptation to crank the bass, the juicy parts of the guitar speak very vibrantly in the mid to upper range of the frequency spectrum. In a mixing environment, very few times is a guitar track ever going to need anything boosted down in the 100 Hz area (specifics are going to really depend on the style of music and taste, keep that in mind when reading these posts). The more you turn up a frequency that tends to sit in a different instrument's range, the more you can unnecessarily fill up space in the spectrum and overshadow important aspects of the mix. In order to combat this and help make space for your tracks, you can use what is commonly referred to as 'subtractive EQ.' All this means, is that instead of turning up a needed frequency, you turn down a different one that isn't as important or essential to that specific track in order to showcase the desired frequency to a greater extent. You could be subtracting in order to bring out something within the track itself, or you could be doing it to bring out another aspect of the mix. You can also use to it to aurally de-clutter your mixes. Check out Ex. 1:

If you take a peek at the leftmost section of the grid (this is an EQ i used for a guitar track), you will notice that there is a high pass filter applied which, in this case, is sloping off the lower side between 300-400 Hz. The meatiness of a bass guitar tends to sit right around and below the area where we sloped off. What we have done here is used subtractive EQ to make space within the mix by removing some unnecessary frequencies in the guitar track. This paves the way for both the guitar and bass to coexist nicely within the mix. This can help to make more space in your mix when not only used with guitar or bass tracks, but also when used on other instruments as well. Here is another example of subtractive EQ:
Ex. 2

I used Ex. 2 to cut some of the low end boominess and some of unpleasant midrange coming through an overhead mic on a drum set. Subtractive EQ doesn't always have to appear this extreme, but sometimes you have to get nasty with the settings in order to get the right amount of space necessary to make other elements cut through. As always, it is subject to the style and the desired sound. To close, play with the settings, and use your ears. Also, use reference recordings. Listen to what other people have done to make their mixes rock. It just takes lots of practice.
Monday, February 11, 2013
Mix Space: A Place for Everything
In yesterday's post, I talked about widening your guitar sound by doubling the recorded guitar track, panning each one, and then delaying one track to emulate a stereo effect. Panning is a tool that can be used to place a track in a specific spot in the mix which in turn can create space for other elements. But what is space?
To define mix space, I have found that the easiest way to understand it is through a mental picture. Close your eyes and imagine a clock face in front of you where your nose is at 12 and each of your ears are at 9 and 3, respectively. This entire field between 9 and 3 (or between your left and right ears) sweeps out in a semi-circle. This will give you an idea of what the stereo field looks like. To see it in a digital format, check out Ex. 1:

This is a slightly different image than the clock face but still perfectly applicable. When we discuss space, it is referring to these sorts of images, even though the stereo field is actually invisible. Yesterday, we panned our two tracks hard left and hard right. Using the clock analogy, that would be one track at 9, and the other at 3. This means that both tracks are panned to the outermost edge of the stereo field. When we use this sort of hard panning, it leaves lots of space in between to put other things such as vocals, keyboards, and auxiliary percussion. This what we refer to as 'space' in a mix or 'making room.' You want each instrument or part to have its own area in the mix to occupy. Please note that the subject of panning and space is all relative to your project, style, needs, and desires. For example, you may need your guitars closer to the center (or closer to 12 on the clock face) within your mix due to the piano taking up the outer edges. It all depends on the requirements. Here are two very different examples for illustration:
First, Shakira's 'Waka, Waka'
Her voice occupies the center most spot in the mix (practically sitting on your nose) while everything else offers a supportive role filling up the space out towards 9 and 3 on the clock face. Depth is also a factor here but will be discussed at a later time.
Second, Whitesnake's 'Love Will Set You Free'
Here, in complete contrast, we have guitars dominating the outer edges of the mix at 9 and 3 for the majority of the track. Listen to the first 10 seconds though, they fill up much of the space for a bit. Once the vocals come in, the guitars still play a prominent role but they make a bit of space so the vocalist will shine through. There is a bit more of a balance though between the vocals and guitar as opposed the vocals being really far out front like in the Shakira example. As stated earlier, song and style dictates a lot.
If you noticed, I mentioned that the 'guitars . . make a bit of space' for the vocals to come through on the Whitesnake example. While it may not have been the case on that particular song, panning can and often changes depending on what is happening throughout the duration of the track. Don't be afraid to move things a little to make some more space for another instrument at a given spot in your track. You can always put the panning back after your troublesome spot. Automation is your friend!
To close, making/having space in a mix is essential and will definitely contribute to polishing your product when used correctly.
To define mix space, I have found that the easiest way to understand it is through a mental picture. Close your eyes and imagine a clock face in front of you where your nose is at 12 and each of your ears are at 9 and 3, respectively. This entire field between 9 and 3 (or between your left and right ears) sweeps out in a semi-circle. This will give you an idea of what the stereo field looks like. To see it in a digital format, check out Ex. 1:
This is a slightly different image than the clock face but still perfectly applicable. When we discuss space, it is referring to these sorts of images, even though the stereo field is actually invisible. Yesterday, we panned our two tracks hard left and hard right. Using the clock analogy, that would be one track at 9, and the other at 3. This means that both tracks are panned to the outermost edge of the stereo field. When we use this sort of hard panning, it leaves lots of space in between to put other things such as vocals, keyboards, and auxiliary percussion. This what we refer to as 'space' in a mix or 'making room.' You want each instrument or part to have its own area in the mix to occupy. Please note that the subject of panning and space is all relative to your project, style, needs, and desires. For example, you may need your guitars closer to the center (or closer to 12 on the clock face) within your mix due to the piano taking up the outer edges. It all depends on the requirements. Here are two very different examples for illustration:
First, Shakira's 'Waka, Waka'
Her voice occupies the center most spot in the mix (practically sitting on your nose) while everything else offers a supportive role filling up the space out towards 9 and 3 on the clock face. Depth is also a factor here but will be discussed at a later time.
Second, Whitesnake's 'Love Will Set You Free'
Here, in complete contrast, we have guitars dominating the outer edges of the mix at 9 and 3 for the majority of the track. Listen to the first 10 seconds though, they fill up much of the space for a bit. Once the vocals come in, the guitars still play a prominent role but they make a bit of space so the vocalist will shine through. There is a bit more of a balance though between the vocals and guitar as opposed the vocals being really far out front like in the Shakira example. As stated earlier, song and style dictates a lot.
If you noticed, I mentioned that the 'guitars . . make a bit of space' for the vocals to come through on the Whitesnake example. While it may not have been the case on that particular song, panning can and often changes depending on what is happening throughout the duration of the track. Don't be afraid to move things a little to make some more space for another instrument at a given spot in your track. You can always put the panning back after your troublesome spot. Automation is your friend!
To close, making/having space in a mix is essential and will definitely contribute to polishing your product when used correctly.
Sunday, February 10, 2013
Big Guitars: Makin' it Wider
Let me set up a scenario: You are in your studio, and just finished laying down a rhythm guitar part for a new song. You hit the right notes, your amp tone sounds good, everything seems to have been set up perfectly. Then you hit the playback button . . . something is missing. Depending on how you recorded your tracks, your guitar track probably sounds very centered in the mix, not at all spread out extra wide and thick like that Metallica record you listen to all the time. What do you do?

Much of the time, guitar tracks are recorded in mono. This means there is just one track (and one waveform) and usually the default panning (the knob above the volume fader in your recording software) is set to center. So, if you are listening to your mix on headphones, it's going to sound as though the guitar was coming right at your nose. Most of the time, this is probably not what you are going to want and it isn't going to deliver that massive sound. What you are looking for (whether consciously or not) is that wide, stereo sound. The big guitar, wall of sound associated with many of the famous rock recordings within the past 30 years is attributed to a myriad of different sound engineering tactics including everything from stereo miking to playing each rhythm part twice. However, there is one very simple, very easy tactic you can use to help get that big sound and take your mono guitar track into a wide, stereo-emulating, guitar sound. For starters, double your guitar track. You should be able to right-click on the track and select that option (it may be referred to as cloning). Then pan your original track hard left, and your newly doubled track, hard right. See Ex. 1:

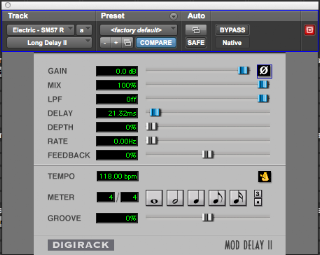
In the picture, I only panned mine to 80% on either side, but you can pan all the way to 100%. You want to be sure to pan in order to create space (I will discuss 'space' in a later post). If you do not, they will only make the guitar part louder and even more in the way of everything else in the mix. The next step is REQUIRED to effectively use this technique. Go to your effects rack for your newly doubled track and add a delay. This is not going to be your solo delay type of effect, but rather a literal 'delaying' of the sound. What we are going to do, is delay the arrival time of the doubled track to your ear. In this case, it is the right ear. This causes an offset between the two tracks and in turn, it creates a stereo-like effect. See Ex. 2:

Set the delay time to around 20 ms (I set it a little past that in the picture). Depending on the plugin you use, make sure the 'mix' and 'gain' controls are all the way up. You should hear an instant 'widening' of the sound and some distinct separation between the left side and the right side (you can hear this effect best with headphones). To understand what is going on here, think of it this way . . . you have two guitarists standing about 20 feet apart from each other playing the same song and you are standing directly between them. They may be playing the song together incredibly well but because of the human factor, they are simply not going to hit the strings at precisely the same fraction of a second. This is going to cause the sound coming from their amps to hit each of your ears at slightly different times. The resulting sound from this sort of a situation is a stereo effect which is what we have emulated in the above examples. You can use this tactic in a lot of different situations and for many different styles of music. Please understand though that this is very subjective. The width of your guitar (% of panning and amount of delay) is going to depend highly on the type of music you are recording. For example, if you are recording an R&B track, you may not want it that wide. It all depends on taste. Always keep that in mind.
Welcome!!!
Aloha and welcome to the GTRMix blog! My goal in authoring these posts is to help aspiring musicians further their mixing capabilities in their own studios. For starters, every musician who finds this blog is welcome here. The blog title is targeted towards those of us who have selected the corruptive instrument, the guitar, as their means of expression (including myself). Like any dedicated musician, each instrument comes with its own perspective in the grand spectrum of the mix, both live and in the studio. That perspective, if not kept in check, can taint even the best song in the world. Now, there is hope!!! Don't stop reading here. The goal (again, with any instrument) is whilst in the studio, specifically your own studio, one must learn to step out from behind your pedals, rig, or drum set, and into the mix engineer's chair and depending on the situation, the producer's chair. This blog will be geared specifically from a guitarist's perspective and hopefully, will help other guitarists craft better mixes and ultimately, a better product. Don't be shy, please chime in with questions and any alternate ideas you may have!
Subscribe to:
Posts (Atom)